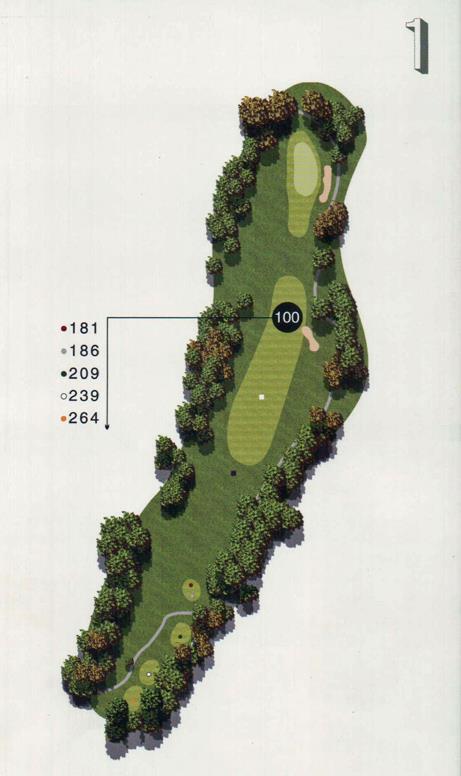
|
|
|
|
Hole #1
Hole Description
Hole 1 offers an easy introduction to this challenging course. This short par 4 hole has beautiful Lake Murray along the right side and a steep bank along the left. So keeping your tee shot in the fairway is a definite plus. You will have a short iron into a green that slopes to the right toward a deep greenside bunker. Putting can be difficult or simple, depending on the pin placement.
Hole #2
Hole Description
Hole 2 does not have any water to contend with (even though the green offers a great view of Lake Murray), but is rated as the number one handicap hole. No. 2 is a long (419 yards), dogleg left par 4 which requires a well placed tee shot that avoids a long left side bunker and rough and woods on the right. Your second shot is all uphill to a very undulating and sloping green. Shot placement and pin location are critical to scoring. Before leaving remember to get a view of Lake Murray from the top of the hill.
Hole #3
Hole Description
Hole number 3 is a dogleg right to a hard to hold green. The ball must be SLIGHTLY faded to get between the left and right fairway bunkers. The second shot should land very gently on the green or run up the small strip between the front bunkers.
Hole #4
Hole Description
Hole number 4 is a challenging picturesque par 3 that looks out over Lake Murray and requires that your tee shot carries the pond fronting the entire green. If your shot goes slightly left, you are in a long bunker with the lake in front of your shot out. If you go slightly right you will be in the pond. The hole ranges from 196 yards at the back to 122 yards at the forward tees.
Hole #5
Hole Description
Hole number 5 is a straightforward par 5 but you must be careful of the greenside bunkers awaiting a short second or third shot. The bunkers are challenging and the green runs strongly from back to front.
Hole #6
Hole Description
Hole number six is a severe dogleg left with an uphill tee shot. Once clear of the hill on the left a short iron should out you on another back to front sloping green.
Hole #7
Hole Description
This is a beautiful straight-away par 4 (410 yds) that requires a good tee shot and long iron or fairway wood second shot to reach the green in regulation. The two tiered green can make putting a challenge.
Hole #8
Hole Description
Hole number 8 is a straight forward par3. It is well bunkered and has an interesting green.
Hole #9
Hole Description
Hole number 9 is a short dogleg to the right. The slipperiness of the green makes this a challenge. Playing to the left fringe is a safe play for your par.
Hole #10
Hole Description
Hole number 10 is straightforward with a large green although the bunkers must be carefully navigated.
Hole #11
Hole Description
Hole 11 requires placing your ball between the woods on the right and the large bunker on the left. The two level green makes for interesting pin placements.
Hole #12
Hole Description
Hole number 12 is a second or third shot hole. If you are within your range for a second shot to the green it sets up well for an easy eagle/birdie. If you are mortal you may want to lay up with your third shot and then go for a chip over the pond.
Hole #13
Hole Description
Hole number 12 is a second or third shot hole. If you are within your range for a second shot to the green it sets up well for an easy eagle/birdie. If you are mortal you may want to lay up with your third shot and then go for a chip over the pond.
Hole #14
Hole Description
Hole number 14 is not as easy as the handicap rating shows. Out of bounds on the left and the woods on the right along with a front to back sloping green make it not as easy as it looks.
Hole #15
Hole Description
With hole 15, some say the par 4 is the "best par5" on the course. Many folks don't challenge the long uphill shot and choose instead to lay up to the fairway between two of the creek crossings, hit a wedge on, then hope to one-putt for their par. A tricky back to-front sloping green sometimes ruins that plan as well.
Hole #16
Hole Description
Hole number 16 is a second shot hole after you have cleared the pond, beware the bunker on the right. This is the one par 4 on the course that you can reach the green with your drive.
Hole #17
Hole Description
Hole 17 mirrors hole 4 without the challenge of the Lake which is replaced with a pond.
Hole #18
Hole Description
Hole 18 is the course's signature hole. A beautiful par 5 hole measuring 483 yards from the back tees and requires a blind tee shot to those willing to go for it can reach the green in two shots. But, if you don't quite catch the shot pure, you will be in the Lake, then hitting four after your drop. Pin location can change club selection.
|
|
|
|
|